Parts and Schematics
Be sure you have read and agree to the terms and conditions before proceeding.
As a Reminder…
You are free to use these designs as long as you:
- Don’t use the design to build a machine for sale
- Don’t use the design to make materials (including aerogels) for sale
- Don’t use the design for evil
- Assume all risks and liabilities associated with implementing the design and understand that neither Aerogel.org nor the patent holder is responsible for any costs, damages, injuries, or (Heaven forbid!) death that may result as a consequence of the design or advice given on Aerogel.org
- Reference where the design came from when presenting your work at school, work, a science fair, a conference, on the Internet, etc. (see Citing Aerogel.org in a Bibliography)
- Are over 18 and are responsible or are working under the supervision of someone who is over 18 and responsible
You are able to:
- Use the design for doing a science project
- Use the design for scientific research
- Donate stuff you make to a person or team, as long as the receipients adhere to the limitations above
- Improve upon the design and teach others about your improvements on Aerogel.org’s discussion boards
- Have fun making aerogels of your very own!
See the full terms and conditions for details.
Configuring Your Manuclave
We currently have designs for two sizes of CO2 manuclaves on Aerogel.org:
The diameter of the opening limits how big you can make your aerogels. The 1.9″ vessel will require you to find a licensed welder who can weld stainless steels 304 and 316, since large pipe fittings are prone to leaks if just sealed with pipe thread tape. This will take some additional time and effort to arrange and typically adds $75-$300 to the cost of the design.
You can use pipe fittings made of either stainless steel 304 (SS304) or stainless steel 316 (SS316) for these designs, but you should use all of one or the other, especially if you are going to have any of the joints welded. Although both alloys are compatible with supercritical CO2, SS316 is generally preferred but is more expensive. We recommend you use SS316 if you can afford it. DO NOT USE BRASS, CARBON STEEL, OR IRON UNLESS OTHERWISE STATED. Brass is acceptable only as a fitting for a pressure gauge.
A “sighted manuclave”-one with a sight window-requires one additional component, namely the sight window, which typically has a 10-12 week lead time and is available from J.M. Canty Company (more information below). Take it from us-a window is a major plus! This item should only add about $150-$250 depending on the size of the manuclave. Also, it can be added later if you don’t have the money or patience at the start.
Manuclave Designs and Costs
Estimated prices for the different design variations of the Aerogel.org manuclave (not including shipping charges or tax):
3/4″ Pipe Tee Body, 1″ Diameter Opening, No Window, Welding Not Necessary ~$550
1.5″ Pipe Tee Body, 1.9″ Diameter Opening, No Window, Welding Necessary~$900
3/4″ Pipe Cross Body, 1″ Diameter Opening, With Window, Welding Not Necessary ~$700
1.5″ Pipe Cross Body, 1.9″ Diameter Opening, With Window, Welding Necessary ~$1500

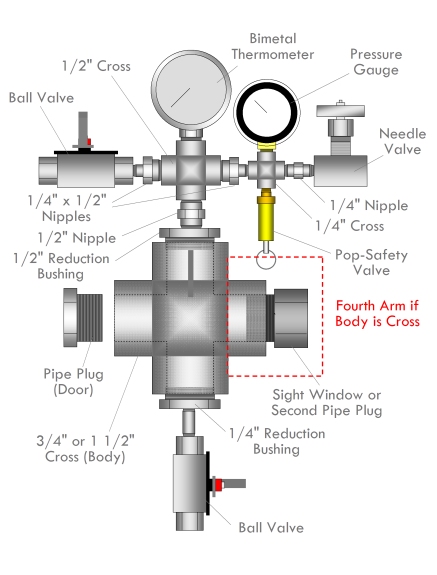
Schematic for manuclave design. The body of the vessel may be a cross (+) or a tee (T) depending on whether or not you plan to add a window.
What’s So Expensive? Isn’t This Thing Just a Bunch of Pipe Fittings?
Small pipe fittings and low-pressure pipe fittings are cheap, but pipe fittings for high pressure service can easily cost $50-$150 each. Crosses, for example, tend to be very expensive because of how thick they are and because of their complex shape. Remember, these aren’t the kind of parts sold at a hardware store. Stuff adds up really quick!
Also keep in mind projects are always more expensive than you think they’re going to be, especially with supporting materials and trial-and-error, so use this is a minimum cost guideline.
Optional High-Pressure Windows
Sight windows for high pressure service are not common items and high pressure NPT-threaded windows are even harder to come by. As a result, the optional sight windows for the Aerogel.org manuclave designs must be custom ordered.
We recommend J.M. Canty, Inc. as a source for NPT-threaded windows. We have listed part numbers that you can give them along with approximate prices of the different windows, but keep in mind prices of these windows change frequently and can fluctuate as much as $100-$200. The prices we posted here are just to help get a sense for the relative cost of the different options they have available so don’t try to quote those prices if you place an order for your system.
Expect a long lead time, anywhere from 6 to 18 weeks.
If you use a different vendor, tell them you are looking for an NPT-threaded sight window rated for 2000 psi service, with a 3/4″ or 1.5″ male NPT thread (depending on the design) and preferrably a corrosion-reistant body, for example stainless steel or Hastelloy.
You can contact J.M. Canty at:
J.M. Canty, Inc.
6100 Donner Road
Lockport, NY 14094
www.jmcanty.com
Phone: (716) 625-4227
Fax: (716) 625-4228
Parts Lists
The parts lists are divided into four tables below:
- Pressure vessel parts you need for any configuration
- Pressure vessel parts specific for each configuration
- Hose, connectors, and structural support parts
- Other supplies you will need
- Optional windows for sighted manuclaves
We’ve included links to McMaster-Carr part numbers for suggested parts in stainless steel 316 where available. We recommend you take the specifications for these parts to a local plumbing supply house, which can probably get you a much better price than McMaster-Carr.
- It is okay to substitute stainless steel 304 for stainless steel 316 for pipe fittings and valves
- It is okay for gauges to have brass threads
- It is okay for valves to have carbon steel bodies
- It is NOT okay for pipe fittings to be made of brass or carbon steel
- It is NOT okay to use fittings, valves, or gauges rated for lower than 2000 psi
1. Pressure Vessel Parts Needed for Any Configuration
| Quantity | Part | McMaster-Carr Part Number/Link | Appxoimate Cost |
| 2 | Medium-pressure ball valve, 1/4″ NPT, stainless steel 316, 2000 psi at 200°F | 4040T81 | $40 / each = $80 |
| 2 | Hex nipple, 1/2″ reduced to 1/4″ NPT, 1-11/16″ length, stainless steel 316, 6600 psi at 72°F | 48805K871 | $16 / each = $32 |
| 1 | Hex nipple, 1/2″ NPT, 1-29/32″ length, 6600 psi | 48805K911 | $15 |
| 2 | Hex nipple, 1/4″ NPT, 1-13/32″ length, 7500 psi at 72°F | 48805K81 | $8 / each = $16 |
| 1 | Cross, 1/2″ NPT, stainless steel 316, 3000 psi | 4443K654 | $100 |
| 1 | Cross, 1/4″ NPT, stainless steel 316, 3000 psi | 4443K652 | $45 |
| 1 | Medium pressure, needle valve, female x female 1/4″ NPT, stainless steel 316, 6000 psi at 2000°F | 7833K96 | $55 |
| 1 | Brass ASME pop-safety valve, with pull-ring for testing, discharges to atmosphere, 1/4″ NPT male, 2000 psi pop pressure | 5825T221 | $90 |
| 1 | Bimetal thermometer, 1/2″ NPT male, 0-250° F/-20-120°C, 2° F/1° C increments,
stainless steel 304, dry dial |
3956K183 | $70 |
| 1 | Pressure gauge, 0-3000 psi/0-20000 kPa, 1/4″ NPT bottom connection, 2 1/2″ dial | 4000K722 | $10 |
2. Pressure Vessel Body Parts Specific to Each Configuration
| Quantity | Description | McMaster-Carr Part Number | Approximate Cost |
| For 1″ opening weld-free design: | |||
| 1 | Hex reduction bushing, male x female, 3/4″ reduced to 1/2″, 3000 psi | 4443K734 | $9 |
| 1 | Hex reduction bushing, male x female, 3/4″ reduced to 1/4″, 3000 psi | 4443K413 | $9 |
| 1 (2 if you want to add a window in the future but not right now) | Hex plug, 3/4″ NPT male, 3000 psi, stainless steel 316 | 4443K725 | $6 to $12 |
| If you want to install a window now or eventually: | |||
| 1 | Female cross, 3/4″ NPT, 3000 psi, stainless steel 316 | 4443K655 | $130 |
| If you are not installing a window: | |||
| 1 | Female Tee, 3/4″ NPT, 3000 psi, stainless steel 316 | 4443K645 | $50 |
| For 1.9″ opening need-to-weld design: | |||
| 1 | Hex reduction bushing, male x female, 1-1/2″ reduced to 1/2″, 3000 psi | 4443K419 | $30 |
| 1 | Hex reduction bushing, male x female, 1-1/2″ reduced to 1/4″, 3000 psi | 4443K443 | $25 |
| 1 (2 if you want to add a window in the future but not right now) | Hex plug, 1-1/2″ NPT male, 3000 psi, stainless steel 316 | 4443K728 | $30 – $60 |
| If you want to install a window now or eventually: | |||
| 1 | Female cross, 1-1/2″ NPT, 3000 psi, stainless steel 316 | 4443K658 | $370 |
| If you are not installing a window: | |||
| 1 | Female Tee, 1-1/2″ NPT, 3000 psi, stainless steel 316 | 4443K648 | $160 |
3. Hose, Connectors, and Structural Support Parts
| Quantity | Description | Use | McMaster-Carr Part Number | Approximate Price |
| For 1″ opening design: |
||||
| 2 | U-bolts for 3/4″ pipe, 1/4″-20 thread, A=1-1/4″, B=2 1/4″, C=1-1/4″, thread length = 1-1/4″, work load 435 lbs. | To fasten the manuclave to its stand | 8896T94 | $5 / each = $10 |
| For 1.9″ opening design: |
||||
| 2 | U-bolts for 1-1/2″ pipe, 1/4″-20 thread, A=2″, B=3 1/4″, C=1-3/8″, thread length=1-3/8″, work load 435 lbs. | To fasten the manuclave to its stand | 8896T123 | $5 / each = $10 |
| For all designs: |
||||
| 1 | CGA320 Inlet Nut, 0.950″ Long | Screws onto CGA320 thread for converter nipple | 79215A653 | $3 |
| 1 | CGA320 Inlet Nipple, 2.5″ Long | Inserts into inlet nut to convert CGA320 thread to 1/4″ NPT | 79215A654 | $5 |
| 1 | Pipe to quick disconnect hose adapter, double shut-off hydraulic, male socket, 1/4″ NPT x 1/4″ quick disconnect, yellow brass, 2250 psi at 72°F | Makes it possible to connect hose to gas tank without having to screw together fixed connectors | 5316K12 | $15 |
| 2 | Pipe to quick disconnect hose adapter, double shut-off hydraulic, female plug, 1/4″ NPT x 1/4″ quick disconnect, yellow brass, 2250 psi at 72°F | To connect hose to gas tank and manuclave | 5316K38 | $10 / each = $20 |
| At least 60″ | High pressure braided stainless steel hose, 1/4″ male NPT rigid ends, 60″ length, 1800 psi at 72°F | To deliver carbon dioxide from the tank to the manuclave | 5793K61 | $40 |
| 1 | Pipe to quick disconnect hose adapter, double shut-off hydraulic, male socket, 1/4″ NPT x 1/4″ quick disconnect, yellow brass, 2250 psi at 72°F | To connect the hose to the manuclave | 5316K21 | $16 |
| – | Sturdy wood planks or aluminum plate | To make a stand for holding the manuclave upright | – | – |
4. Other Supplies You’ll Need
| Description | Use | Example McMaster-Carr Part Number/Link | Approximate Cost |
| A heat gun or hair dryer | To heat the manuclave | 3149K13, but seriously a $20 hair dryer will work | Heat gun = $85
Hair dryer = $20 |
| Roll of pipe thread sealant tape (also called anti-seizing or Teflon® tape), 1/2″ width, 50′ length | Wrapping all pipe threads to ensure high pressure seal-buy lots, this is a consumable | 4591K12 | $1.50 / roll = $15 for 10 rolls |
| A trusty crescent wrench, length 15″ jaw grip 1-11/16″ | Assembly, opening and closing the manuclave “door” (pipe plug) | 5385A16 | $20 – $35 |
| Liquid CO2 tank with a siphon tube, CGA320 connector | Source of carbon dioxide for supercritical drying | Check a local welding supplier or beverage supply company | $8-$20 per tank |
5. Optional Windows for Sighted Manuclaves (available from J.M. Canty, Inc.)
| Manuclave Design | Description | J.M. Canty Part Number | Approximate Cost | Comments |
| 1″ Opening (3/4″ NPT) | 3/4″ NPT Fuseview Sight Window, Carbon Steel Body, 2000 psi | CS-3/4-GS2000 FUSEVIEW | $150 | Susceptible to oxidation, care must be taken to keep dry |
| 1″ Opening (3/4″ NPT) | 3/4″ NPT Fuseview Sight Window, Stainless Steel Body, 2000 psi | SS-3/4-GS2000 FUSEVIEW | $275 | Recommended, more oxidation resistant |
| 1.9″ Opening (1.5″ NPT) | 1.5″ NPT Fuseview Sight Window, Carbon Steel Body, 2000 psi | CS-1.5-GS2000 FUSEVIEW | $300 | Susceptible to oxidation, care must be taken to keep dry |
| 1.9″ Opening (1.5″ NPT) | 1.5″ NPT Fuseview Sight Window, Hastelloy C276 Body, 2000 psi | C276-1.5-GS2000 FUSEVIEW | $600 | Recommended, more oxidation resistant |
Assembly
Assembling NPT Pipe Fittings with Pipe Thread Tape
Looking face-on down the length of a male-threaded pipe fitting, take the pipe thread tape and start to wind it clockwise around the thread. Make sure all of the threads near the edge are covered. Wrap four to five layers around the thread. Now, insert the fitting into the female mating connector and screw it in as far as you can with your fingers. Finally, take a wrench and screw it in as far as you can with the wrench. This should provide a suitable high-pressure seal.
Remember to use torque to your advantage—use a long wrench and apply force at the end of the wrench.
It’s best to use an adjustable crescent wrench or fitted crescent wrench set instead of a pipe wrench (which has teeth) for assembling pipe fittings so you don’t damage the pipe fittings in gripping them.
Tips and precautions:
- Don’t use thread sealing compounds, they really don’t hold at high pressures
- Don’t try to epoxy or glue fittings together
- Don’t try to weld fittings together—only have a professional do welding
- Make sure to clean the threads and pipe thread tape of any detritus before wrapping
- If a fitting doesn’t seem to be threading right, don’t force it or you will strip the threads and make the fitting useless—this is especially important with brass fittings
- Remember you need to not only get the fittings tight but also facing in the right direction so try to plan ahead as you’re tightening—you may not get them as tight as you possibly can as a result but should get reasonably close
- Larger pipe fittings (a 1-1/2” pipe plug for example) will require five to six layers of pipe thread tape up and down the entire thread
Special Considerations With Valves
Valves are sometimes designed to be disassembled, especially at the handle. If you find a valve is leaking, check to see if something on the valve needs to be tightened. If a valve is sticking or is too loose, check to see if the handle nut needs adjustment.
Special Considerations With Windows
Be extra careful when installing windows. They can crack if they are overtorqued or overtightened. Use three to four layers of pipe thread tape with them, screw them in until comfortably tight but not supertight, and pressurize carefully to check for leaks. Once the window is installed, leave it in—don’t repeatedly take it out and reinstall it.
Welded Joints
If your design needs to be welded or you want to minimize leaking, you will need to find a professional welder. This is not you, even if you have welded stuff before, unless you are a professional, licensed welder. Stainless steels have high chromium content which makes them very difficult to weld and an amateur job can fail catastrophically.
Weld Locations (if Welding is Necessary)
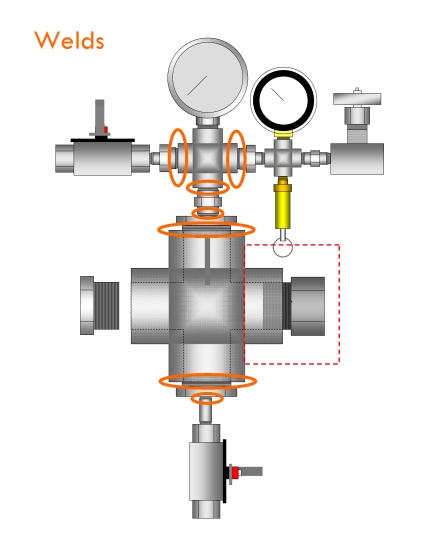
Use this diagram to help explain to the welder what needs to be welded. Valves and gauges are not welded. You can weld the cross connecting the pressure gauge, pop-safety valve, and needle valve to the main body but it’s not necessary and we recommend leaving it connected by tape seal for servicing.

If you are building a manuclave with a 1-1/2" cross (+) or tee (T) as the body, you will need to weld the joints in the orange circles. Don't weld anything else, though.
Pipe Thread Tape Seals (Joints You Shouldn’t Ever Weld)
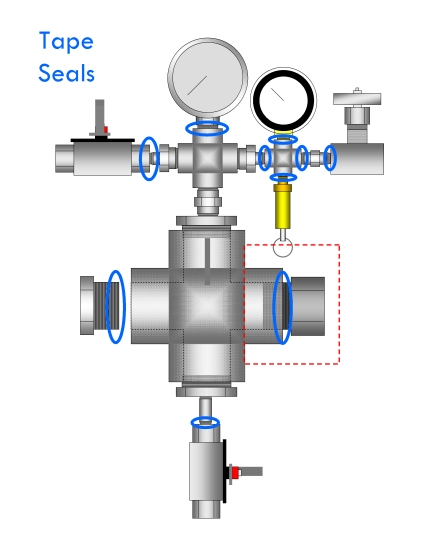
If you are not welding anything, all of the parts need to be joined by pipe thread tape. If you are welding, do not weld the joints in the blue circles.
Once You Finish the Vessel
Now it’s time to connect the gas tank and set up your workspace.


